Here’s a solid guide to building a trading strategy in Pine Script on TradingView:
https://www.tradingview.com/support/solutions/43000562362
https://www.tradingview.com/scripts
Setting Up
In TradingView, open the Pine Script Editor at the bottom of the chart. Start every strategy script with the strategy() declaration instead of indicator():
//@version=5
strategy("My Strategy", overlay=true, initial_capital=10000, commission_value=0.1)
Key parameters: overlay=true plots on the price chart, initial_capital sets your starting capital, and commission_value adds realistic trading costs.
Core Building Blocks
1. Define your inputs — make your strategy adjustable without editing code:
fastLen = input.int(9, title="Fast MA Length")
slowLen = input.int(21, title="Slow MA Length")
2. Calculate your indicators:
fastMA = ta.ema(close, fastLen)
slowMA = ta.ema(close, slowLen)
3. Define entry/exit conditions:
longCondition  = ta.crossover(fastMA, slowMA)
shortCondition = ta.crossunder(fastMA, slowMA)
4. Place orders:
if longCondition
    strategy.entry("Long", strategy.long)

if shortCondition
    strategy.entry("Short", strategy.short)
A Complete Working Example — EMA Crossover with RSI Filter
//@version=5
strategy("EMA Cross + RSI Filter", overlay=true, initial_capital=10000, commission_value=0.1)

// --- Inputs ---
fastLen  = input.int(9,  "Fast EMA")
slowLen  = input.int(21, "Slow EMA")
rsiLen   = input.int(14, "RSI Length")
rsiOB    = input.int(70, "RSI Overbought")
rsiOS    = input.int(30, "RSI Oversold")
slPct    = input.float(1.5, "Stop Loss %") / 100
tpPct    = input.float(3.0, "Take Profit %") / 100

// --- Indicators ---
fastMA = ta.ema(close, fastLen)
slowMA = ta.ema(close, slowLen)
rsi    = ta.rsi(close, rsiLen)

// --- Conditions ---
longEntry  = ta.crossover(fastMA, slowMA)  and rsi < rsiOB
shortEntry = ta.crossunder(fastMA, slowMA) and rsi > rsiOS

// --- Entries ---
if longEntry
    strategy.entry("Long", strategy.long)

if shortEntry
    strategy.entry("Short", strategy.short)

// --- Exits via Stop Loss & Take Profit ---
strategy.exit("Long Exit",  "Long",  stop=strategy.position_avg_price * (1 - slPct), limit=strategy.position_avg_price * (1 + tpPct))
strategy.exit("Short Exit", "Short", stop=strategy.position_avg_price * (1 + slPct), limit=strategy.position_avg_price * (1 - tpPct))

// --- Visuals ---
plot(fastMA, color=color.blue,  title="Fast EMA")
plot(slowMA, color=color.orange, title="Slow EMA")
bgcolor(longEntry ? color.new(color.green, 90) : shortEntry ? color.new(color.red, 90) : na)
Key Functions to Know
| Function | Purpose |
|---|---|
ta.crossover(a, b) | a crosses above b |
ta.crossunder(a, b) | a crosses below b |
ta.ema() / ta.sma() | Moving averages |
ta.rsi() | RSI |
ta.macd() | MACD |
ta.atr() | Average True Range (great for dynamic stops) |
strategy.entry() | Open a position |
strategy.exit() | Close with SL/TP |
strategy.close() | Close by condition |
strategy.position_size | Current position size |
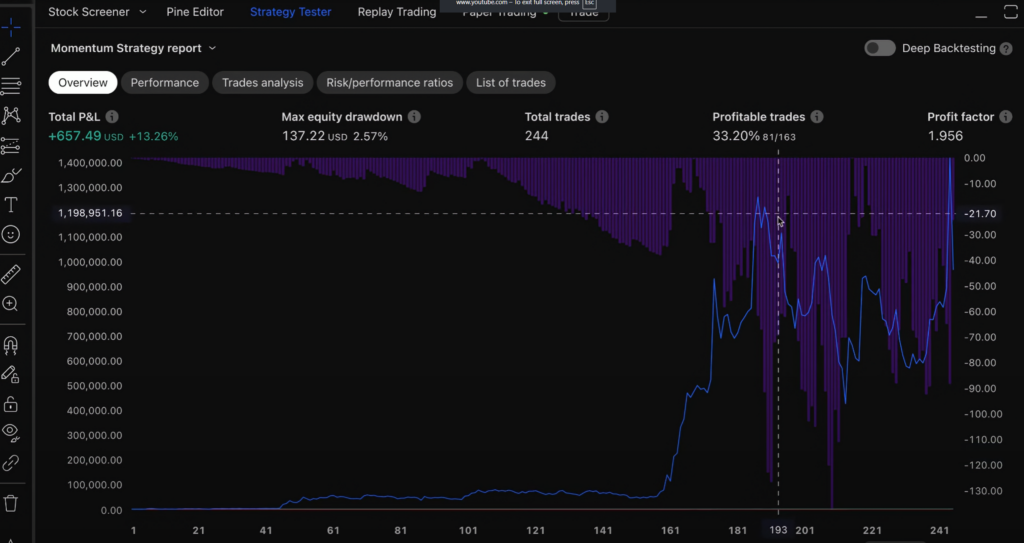
Reading the Strategy Tester
After adding your script to the chart, click the Strategy Tester tab. The most important metrics to evaluate are:
- Net Profit — obvious, but don’t optimize for this alone
- Win Rate — aim for >45% on trend systems, >60% on mean-reversion
- Profit Factor — gross profit / gross loss; anything above 1.5 is solid
- Max Drawdown — how much capital you’d have lost at the worst point
- Sharpe Ratio — risk-adjusted return
Common Pitfalls to Avoid
Look-ahead bias is the biggest one. Always use [1] to reference the previous bar’s value when your signal and execution happen on the same bar:
// Safer: use confirmed close from previous bar
longCondition = ta.crossover(fastMA[1], slowMA[1])
Overfitting — if you tweak inputs until the backtest looks perfect, it’ll likely fail live. Test on out-of-sample data by limiting your backtest date range.
Repaint risk — some indicators like security() with lookahead=barmerge.lookahead_on can repaint, giving unrealistically good results.
Next Steps to Level Up
Once your basic strategy works, you can add:
- ATR-based dynamic stops instead of fixed percentages
- Position sizing with
strategy.entry(qty=...) - Time filters to only trade certain sessions
- Alerts via
alertcondition()to trigger webhooks for automation
TradingView’s Pine Script documentation is genuinely excellent and worth bookmarking. The community scripts library is also a great place to reverse-engineer how others build strategies.
How TradingView Broker Integration Works
TradingView has a built-in broker panel that lets you trade directly from the chart interface. Capital.com is one of the natively supported brokers, so no third-party tools are needed.
Step-by-Step: Connect Capital.com to TradingView
Step 1 — Open the Trading Panel At the bottom of any TradingView chart, click the „Trading Panel“ button (looks like a briefcase icon), or go to the bottom toolbar and select „Trade“.
Step 2 — Find Capital.com In the broker list that appears, search for Capital.com and click on it.
Step 3 — Log In Click „Connect“ and a login window will pop up. Enter your Capital.com credentials (email + password). If you have 2FA enabled, you’ll need to complete that too.
Step 4 — Choose Account Type You’ll be asked whether to connect your Live account or Demo account. It’s strongly recommended to start with Demo to test your setup.
Step 5 — You’re Connected Once linked, you’ll see your account balance, open positions, and order history directly inside TradingView. You can place, modify, and close trades without leaving the chart.
Placing Orders from TradingView Once Connected
You can trade in two ways:
Manually from the chart: Right-click anywhere on the chart → select „Buy“ or „Sell“ → set your order size, stop loss, and take profit visually by dragging the lines on the chart.
From the order panel: The bottom panel will show a full order ticket — market, limit, stop orders — along with your positions and account P&L.
Automating Your Pine Script Strategy with Alerts + Webhooks
TradingView’s native broker integration is manual only — it doesn’t auto-execute your Pine Script strategy signals. To automate, you need to use Alerts + Webhooks. Here’s how:
Step 1 — Add alert trigger to your Pine Script:
pine
alertcondition(longCondition,  title="Long Entry",  message="BUY {{ticker}} at {{close}}")
alertcondition(shortCondition, title="Short Entry", message="SELL {{ticker}} at {{close}}")
Step 2 — Create the Alert in TradingView: Click the clock icon (Alerts) → New Alert → select your script condition → under „Notifications“ enable Webhook URL.
Step 3 — Use a middleware service Capital.com doesn’t natively accept TradingView webhooks directly, so you need a bridge. Popular options are:
| Service | What it does | Cost |
|---|---|---|
| 3Commas | Receives webhooks, executes on broker | From $22/mo |
| Capitalise.ai | No-code automation, Capital.com native | Free tier available |
| PineConnector | Lightweight webhook-to-broker bridge | ~$40 one-time |
| Autoview | Chrome extension, catches alerts | From $5/mo |
| Custom webhook server | Full control via Node.js or Python | Free (self-hosted) |
Step 4 — Configure the middleware Each service gives you a webhook URL. You paste that into TradingView’s alert webhook field. When your strategy fires a signal, TradingView sends a JSON payload to the service, which then places the order on Capital.com via their API.
Capital.com API (for full custom automation)
If you want complete control, Capital.com has its own REST API you can use directly:
python
import requests

# Authenticate
session = requests.post("https://api-capital.backend-capital.com/api/v1/session",
    headers={"X-CAP-API-KEY": "your_api_key"},
    json={"identifier": "your@email.com", "password": "yourpassword"}
)

# Place a trade
order = requests.post(".../api/v1/positions",
    json={"epic": "EURUSD", "direction": "BUY", "size": 1}
)
You’d run this server-side and trigger it when TradingView fires a webhook alert.
Summary: Which Route to Choose?
| Goal | Best Approach |
|---|---|
| Manual trading from chart | Native TradingView + Capital.com integration |
| Semi-automated with alerts | TradingView Alerts → PineConnector or 3Commas |
| Fully automated strategy | TradingView Webhook → Custom server → Capital.com API |
| No-code automation | Capitalise.ai (Capital.com native) |
One important reminder: always test on a demo account first. Even if your backtest looks great, live execution involves slippage, latency, and real money — so paper trade your automation for at least a few weeks before going live.
Capitalize.ai
https://support.capitalise.ai/en/collections/12901488-backtesting-simulating-monitoring
Backtesting, Simulating & Monitoring
Learn how to test, simulate, and monitor your strategies to optimize performance before and during live trading.
By Josh11 articles
SimulationsLearn how to practice strategies on our system.
Running a BacktestA quick guide to setting up and running a backtest on Capitalise.ai.
Analyzing a backtestMeaningful data that you should be looking for.
The Backtest’s Last CandleOpen P/L and closed hits.
Differences Between ModesWhy simulation, backtest, and live strategy results may differ.
Hits and notificationsWhat is a hit and where can you hear about them?


